How to make butterfly wings

29 Sep

how to make butterfly wings

You will need:

A fat quarter of black velvet

white acrylic paint and other colors

hot glue and glue gun

9 metal coat hangers

wire cutters

1 plastic milk jug

About 4 inches of a black feather boa


Directions:

1. cut the hooks off of of two of the coat hangers. Twist about 4 inches of two ends together to form one very long wire. Bend this long wire around into the shape of a butterfly’s top wing, wrapping about 4 inches of the other end together to complete the shape.

steps 1 and 2

2. Repeat to create the other top wing. Before completing the the shape, wrap the coat hanger around the first wing where the center meets.

3. Wrap ends of butterfly wing shapes together.

steps 3 and 4

4. Attach wings together by wrapping wires together at base of the butterfly wing structure.

5 & 6. Repeat with all wings to form wire skeleton for butterfly wings

steps 5 and 6

7. Attach a wire hook for support.

Using your last coat hanger, cut off the hook and discard. Bend the body in half and wrap ends around wire framework at base.

steps 7 and 8

8. Cut out a flat piece of a plastic milk jug and attach to the wire hook (this adds comfort and support to the wings. You may also like to create a harness for the wings by attaching a wide ribbon to the plastic as shoulder straps.

9. lay the wire frame onto the black velvet. cut out the upper butterfly wing shape as one piece. Cut out each lower wing separately. Give yourself about a one inch seam allowance.

step 9


10. Firmly pull the black velvet as you glue it to itself around the wire (like stretching a canvas)

step 10

11. Paint your pattern with white paint so that a layer of colored paint on top of it will be bright. Let it dry completely before adding color.

step 11


12. Add colored acrylic paint and the boa for finishing touch.

step 12


Enjoy and share!

power up

31 Jul

blog powerMy artistic vision? Betabrand power pants. Oh, don’t get me wrong. The design is plenty gamer-centric enough to be featured as a lead line. Here’s why: 1. Its a great fit with the brand image. you gotta have a little chutzpah to put these babies on. Basically, it’s a go with the disco line. 2. I’ll admit it. There’s a little innuendo here. Maybe I think it’s a good thing to have power pants. “I’m wearing my power pants today” would just kinda set the right tone for the work crowd, don’t you think? Bonus: they’re loading, so that means you’re paying attention (at least to the red head). The 8- bit Challenge Alright, so this design is a throw-back. “Rainbows, really” You say. But no! There’s more. In an earlier version of this design, I catalogued all the colors in the 256 Hex library with charming chevrons: 8 bit chevron Yes. It’s a working library, and each color is labeled with the correct HEX number. It’s kinda a habit of mine … I really need to spend less time on the computer. Step Right this Way! We’ve got power bars showing that energy levels are rising and plenty of pixel – byte ratios to keep you thinking about it while you go forth to conquer the world! I give you power pants. Enjoy.

Legend pattern on Spoonflower

25 Jul

legend-blog

Meet legend, my latest little spoonflower creation. It’s for the highways and byways competition. I wanted to take map icons and remix them to create a work of art that is interesting and playful. So a few extra icons also had to jump into the mix. First, England has a new prince and I wanted a part of that in the mix, so the baby blue crown is above the crossing sign, signaling a royal change. There is an astronaut claiming love in the name of his country, a film camera watching, the restaurant icon has food in the spoon and on the fork, a dinosaur considers fast food, the question mark next to the TARDIS, and a few other little visual puns for fun. Thanks for checking out my little design. Please feel free to share it with your friends, and of course it is for sale in my spoonflower shop.

easy layered skirt from a plain pattern

29 Apr

For this tutorial, I started with Simplicity pattern 2356, skirt A. It is a very basic “circle skirt.”

You will need:

  • About 2 yards of fabric, depending on size, fabric design, etc.
  • elastic waist band

Modifications:

  • I added two layers
  • I changed the overall shape of the skirt from a circle to a D shape, with the flat section in the front. This allows the finished skirt to hang evenly in the front and back.
easy layered skirt from plain pattern

step 1: cut out “slip casting” and “front and back” (pieces 1 and 2). Cut the “front and back” piece in half lengthways, and cut the bottom section in half again.

DSC_4631

step 2: cut out layers. I used remnants, and matched pink fabric with a plain cotton broadcloth for the bottom layer.

pieces

All pieces laid out.

sew all circles together

sew all circles together

make_a_layered_skirt

flatten the front of the bottom layer to make a “D” shape. The curved part of the D is the back of the skirt, the flat part is the front. Add the second layer, and trim the front to match bottom layer. Then do the same for the top layer.

finish the edges of each layer. Then sew all layers together at top of skirt.

finish the edges of each layer. Then sew all layers together at top of skirt. position casing so that it will cover your elastic waist band.

DSC_4652

Fold casing over top of elastic, and use “stitch-in-the-ditch” technique to finish skirt.

layered_skirts

Enjoy!

Nile Lotus Cut and Sew Dress tutorial

23 Mar

cut and sew girl's dress

This is a tutorial for the Nile Lotus girl’s dress. The model in these instructions is a girl’s size 4, but you can easily tailor the dress for sizes 2 to 6 by following this tutorial. Other sizes can be accommodated with a little creativity on your part.

For this project, you’ll need:

  • one yard of the Nile Lotus cut and sew pattern by motyka, available at: http://www.spoonflower.com/designs/1804950
  • dress zipper
  • pins
  • 2 pieces of string for measuring (or a measuring tape, or long pieces of scrap fabric)
  • tailor’s chalk
  • an iron
  • thread (I used mercerized cotton covered polyester)
  • a sewing machine (This dress only uses straight stitches, I recommend setting the machine to 12 inches per stitch for all seams and hems)
  • universal or medium weight sewing needle (I used a double needle for finished hem lines)
  • pinking sheers (optional)
  • shoe lace (optional)

Directions:

When your pattern arrives, it will look like this. You will need to wash and iron it before you start.

cut and sew dress pattern

Step 1: Carefully cut out all pieces along the dotted lines on the pattern, like this:

cut and sew pattern

Step 2: Cut the skirt to fit. Here’s how.

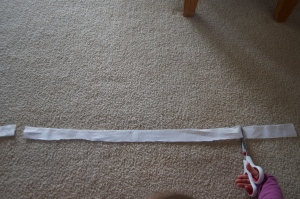
Using a piece of string or leftover fabric, measure your child’s waist. add three inches and cut. like this:

how to measure waist for a dress pattern

DSC_6099

Step 3: Shape the string into a circle with 1/4 inch overlap. Center the circle in the middle of the circle and using tailor’s chalk, outline the circle onto the center of the fabric. This will make the skirt of the dress. Like this:

Cut and sew dress pattern, cut out waist

Step 4: Cut out the center of the dress around your outline (The red circle in the center fits a size 4 waist).

Cut and sew dress pattern, cutting out waist

Step 5: Cut the bodice to fit. Here’s how.

Using another piece of string, measure your child’s chest and add three inches. Cut the string. This will be the length of the bodice. Mark and trim the bodice to match the length of the string.

Cut and sew dress pattern, trim bodice

Step 6: Shape the top pf the bodice (this gets a little tricky. If you are a beginning sewer, you may want to leave the bodice as a rectangle and skip ahead to attaching shoulder straps as indicated in the directions printed on the pattern).

Fold the rectangular bodice in half. Place the fold on the center of your child’s chest, and carefully use a pin to mark where you want the front of the shoulder straps to lay. Like this:

Cut and sew dress pattern, fit bodice

Step 7: Cut a shallow scoop neck by trimming one inch off the top of the folded bodice from the center fold to 1/2 inch before the pin. Taper at about 2 inches from the shoulder strap pin.

Step 8: Use a pin to mark where you want the bottom of the arm hole to lay.

Have your model stand with her arms straight up and position the fold of the bodice at the center of her chest. Carefully place a pin under her armpit where you want the bottom of the arm hole to lay (this step is not actually pictured). When you place the armpit pin, the bodice should look like this:

Cut and sew dress pattern, fit arms

Step 9: Fold the ends of the bodice back toward the center along the armpit pin. Carefully cut out a scoop shape for armholes.

Cut and sew dress pattern, scoop neck

Lay the bodice flat, and if you have pinking sheers, carefully trim the edges of curves so they will be stronger and lay flat when you make the seam allowance. It should look like this:

Cut and sew dress pattern, perfect fit

Step 10: Make skinny shoulder straps. Here’s how.

Cut shoulder straps in half long ways.

how to make shoulder straps

Step 11: Sew two shoulder straps together end to end, like this:

how to sew shoulder straps

Repeat. Now you have two very long shoulder straps.

Step 12: Here’s a trick for making skinny straps. If you sew a long, strong shoe lace to one end of the strap and then fold and pin the strap around it, you can pull the string to easily turn it inside out. Try it.

how to turn shoulder straps inside out

Step 13: Fold straps in half lengthwise and pin. Sew with 1/8 inch seam allowance. Like this:

sewing shoulder straps

Step 14: Gently tug the shoe lace to turn shoulder straps right side out. Like this:

DSC_6147

Step 15: Remove the shoe lace and iron flat.

iron shoulder straps

Step 16: Finish the straps with a 1/8 inch hem on each side.

how to finish shoulder straps

Step 17: Attach shoulder straps. Here’s how.

Fold, iron and pin 1/4 inch seam allowance around top of bodice. Pin shoulder straps in place between front neck scoop and arm holes. Sew a finishing hem around arm holes and front of bodice.

how to attach shoulder straps to bodice

Step 18: Remove pins from front. Fit bodice on your child and trim shoulder straps, giving yourself 1/4 inch seam allowance for back. fold seam allowance on back and sew the ends of the shoulder straps in place.

how to attach shoulder straps to back

Step 19:

Sew 1/4 inch seam allowance on both ends of bodice.

How to attach dress zipper

Step 20: attach zipper

With zipper closed, pin bodice ends to both sides of zipper iron and sew.

Attach dress zipper to back seam

Sew dress zipper to back of dress

Step 21: Attach bodice to skirt. Here’s how.

Pin facing sides together. Start by attaching the front center of the skirt to the front center of the bodice with one pin. Find the back center of the skirt and attach to the back center of the bodice (where the zipper is). Pin with one pin. Find half of left side of skirt and half of left side of bodice and pin. Repeat on right side. Continue attaching skirt to bodice at half intervals until you have pins at about every half-inch around waist. This will ensure an even gathering and pretty seam.

how to pin bodice to skirt

How to sew bodice to skirt

Step 22: hem skirt.

Fold, iron and pin 1/4 inch seam around base of skirt and sew. Remove pins when finished.

Finish hemhow to Sew a finished hem

Step 23:

Iron and enjoy!

Cut and sew dress tutorial